One-hot vector/encoding
자연어처리(NLP) 분야에서 단어를 벡터로 표현하는 가장 기본적인 방법 중 하나는 One-hot Encoding입니다.
One-hot encoding은 각 단어를 길이가 어휘(vocabulary) 크기만큼인 벡터로 표현하는 방식으로, 하나만 1이고, 나머지는 전부 0의 값을 가지게 됩니다.
예를 들어, 총 10개의 어휘가 있고 그 중 'hotel'과 'conference'이라는 단어가 있다면, 각각을 다음과 같은 벡터로 표현할 수 있을 것입니다.
- hotel : [0, 0, 0, 0, 1, 0, 0, 0, 0, 0]
- conference : [0, 0, 0, 0, 0, 1, 0, 0, 0, 0]
Problems with One-hot Encoding
One-hot encoding은 단순하고 구현도 간단하지만, 다음과 같은 큰 한계점을 가집니다.
첫 번째로는, 유사 단어 간 관계가 전혀 표현되지 않는다는 점입니다.
예를 들어, 사용자가 "Seattle motel"를 검색했다고 해볼게요. 이때 우리는 의미적으로 비슷한 "Seattle hotel"도 결과로 보여주는게 좋겠죠.
하지만, One-hot encoding 방식은..

벡터간의 유사성을 측정할 때에는 두 벡터를 내적하면 되는데, 상단의 결과처럼 두 벡터의 내적값이 0(orthogonal)이 되어버립니다. 즉, 벡터 공간상에서 유사성이 0이 되어, 단어 간 의미적 유사성 (Semantic Similarity)가 반영되지 않습니다.
두 번째 한계점은 바로 Curse of Dimensionality, 차원의 저주입니다.
One-hot encoding으로 나타내고자 하는 어휘 수가 많아질수록 벡터 차원도 함께 커지게 됩니다. 예를 들어, PTB 코퍼스는 50,000차원을 가지고, 구글 1T 데이터는 무려 13,000,000 차원을 가집니다.
이렇게 고차원이고 희소(sparse)한 벡터는 계산 비용도 크고, 효율도 낮아지게 됩니다.
Word Embedding
One-hot Encoding의 문제점을 해결하고자 등장한 것이 바로 Word Embedding입니다.
Word Embedding은 각 단어를 의미적으로 연관된 정보가 담긴 연속적(dense) 벡터로 표현하는 기법입니다. One-hot encoding에서는 단어 간 관계를 담을 수 없었지만, Word embedding 기법에서는 의미적으로 유사한 단어는 공간상에서도 가깝도록 표현됩니다.
예를 들어, "banking"이라는 단어를 다음과 같은 벡터로 표현할 수 있겠죠.

이 벡터를 사용해서 모델은 "government", "crises"와 같은 단어가 주변에 등장할 확률을 예측할 수 있게 됩니다.
여기서는 Word Embedding의 방법 중 하나인 Word2Vec을 알아보겠습니다.
Word2Vec : Neural Network-based Embedding
What is Word2Vec?
- Tomas Mikolov 외 연구진이 2013년 Google에서 개발.
- Shallow Neural network(얕은 신경망)을 활용하여 Word Representation을 학습
Main Idea of Word2Vec
모든 단어와 그 주변 단어(context) 사이의 관계를 예측하자.
즉, 주어진 단어를 기반으로 주변 단어들을 예측하거나, 주변 단어들을 기반으로 중심 단어를 예측하는 방식으로 학습이 진행됩니다. 뭔 얘긴지 밑에서 조금 더 살펴봅시다.
Two main algorithms
Word2Vec은 크게 두 가지 구조로 이루어져 있습니다.

1. Skip-grams : 중심 단어로부터 주변 단어들을 예측
예를 들어, 중심 단어가 "banking"이라면 주변 단어들로 "finance", "loan" 등을 예측하는 알고리즘입니다.
2. CBOW (Continuous Bag of Words) : 주변 단어들로부터 중심 단어를 예측.
예를 들어, 주변 단어들로 "the _____ collapsed in 2008"이 입력되었다면 중심 단어로 "banking"을 예측하도록 하는 알고리즘입니다.
각각을 하나씩 자세히 뜯어보죠. 😊
Skip-Gram Prediction

Skip-Gram은 앞에서 얘기했던 것처럼 중심 단어(center word)가 있을 때 그 주변 단어(context word)들을 예측하는 모델입니다.
위의 예시를 살펴봅시다. 예시에서 중심 단어과 주변 단어는 무엇일까요? window의 크기는 2라고 가정합니다. 중심 단어는 "banking", 주변 단어들은 "turning", "into", "crises", "as"가 되겠죠.
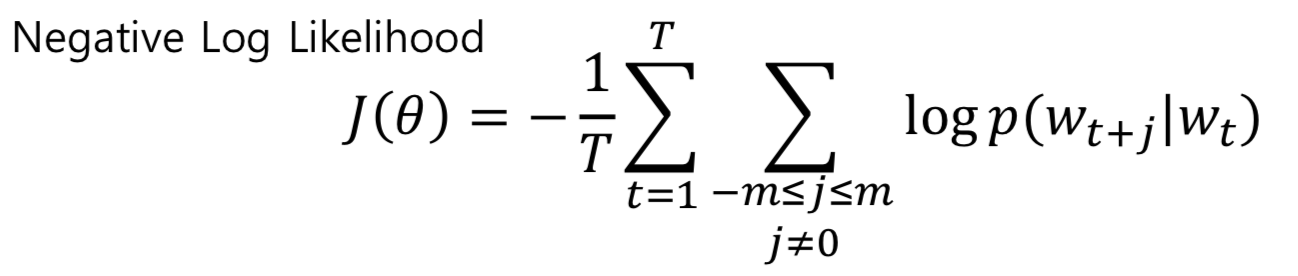
이제 목적함수(Objective Function)를 살펴봅시다.

- : 전체 단어 수
- : 윈도우 크기
- w_: 중심 단어
- w_t+j 예측할 주변 단어
- θ: 학습할 모든 파라미터 (word vectors)
안쪽 곱은 t순간의 중심 단어의 앞 뒤의 단어들을 예측한 확률이고, 바깥 곱은 t가 1부터 T까지의 모든 단어들에 대해 예측한 확률이 됩니다.
하지만 이대로는 학습이 어렵습니다. 왜냐하면 곱은 값이 너무 작아질 수도 있고, 미분하기도 어려워지기 때문입니다. 그래서 실제로 학습할 때에는 다음과 같이 Negative Log Likelihood를 사용합니다.
그러면 학습되는 과정을 예시와 함께 알아봅시다. 다음과 같은 문장이 있다고 해봅시다.

여기서는 중심 단어는 "brown", 주변 단어는 "quick"과 "fox" 겠죠. 우리의 목적은 중심 단어를 보고 주변 단어을 예측하는 모델을 만들어야 합니다. 아래 그림을 왼쪽부터 차근히 따라가봅시다!

1. One-hot Encoding : "brown"을 one-hot vector로 변환해줍니다. 여기서는 [0, 0, 1, 0]으로 변환했네요. 이 vector의 크기는 전체 단어의 개수인 V에 따라서 달라질 겁니다. 만약에 V=4라면, 숫자 네 개짜리 벡터가 만들어지겠죠.
2. Word Embedding : 그 다음, d * V크기의 W_encoder 행렬과 위에서 구한 one-hot vector를 내적해줍니다. 그러면, "brown"에 해당하는 임베딩 벡터 v_c를 구할 수 있습니다. 여기서는 [0.2, 0.8, -1.4]라는 값이 나왔네요.
3. 주변 단어 확률 계산 : 구한 임베딩 벡터 v_c는 W_decoder 행렬과 내적됩니다. "quick"에 해당하는 행과 곱해져서 Softmax 통과하면 확률 벡터가 생성됩니다.
4. 학습 : 예측과 정답 사이에 오차가 있으면, 그 오차를 줄이기 위해 역전파를 통해 W_encoder와 W_decoder를 업데이트해줍니다. 위쪽에서는 정답인 quick에 대한 softmax 확률이 높아서 괜찮지만, 아래쪽에서 fox가 정답인데 잘못 예측했음으로 이 경우 word vector를 조정하도록 학습시킵니다.
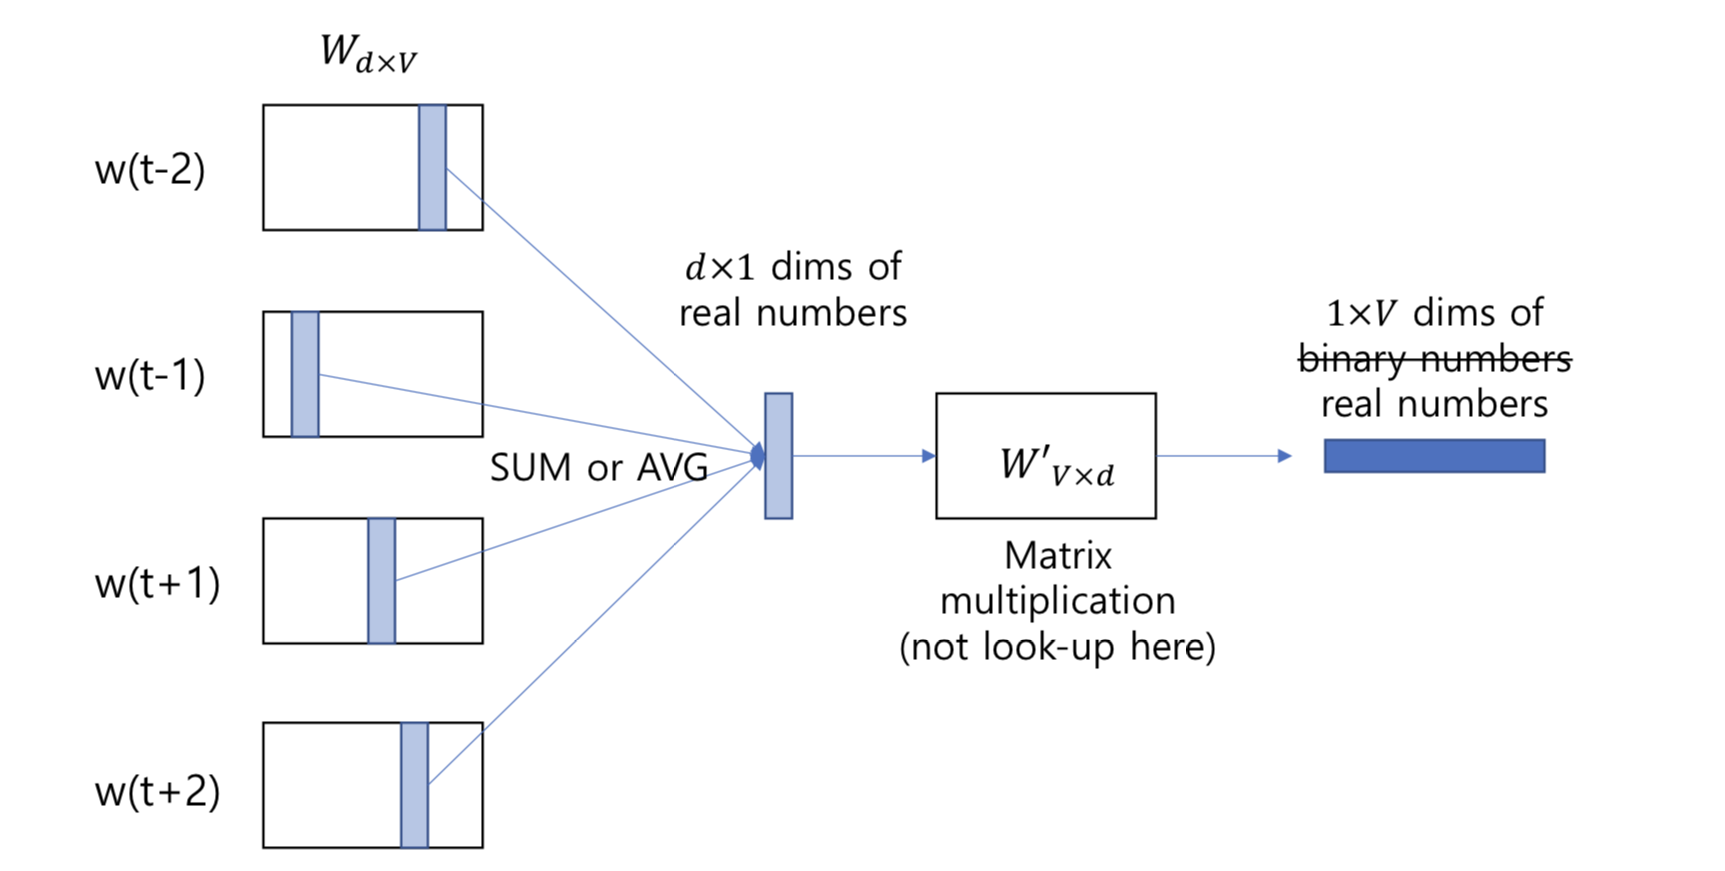
CBOW (Continuous Bag of Words)
위에서 살펴본 Skip-gram과는 반대로 CBOW에서는 주변 단어를 바탕으로 중심 단어를 예측하게 됩니다. 대략적인 구조는 다음과 같습니다.

- 중심 단어: brown
- 문맥 단어: ["The", "quick", "fox", "runs"]
1. One-hot Encoding : 각 문맥 단어는 one-hot vector로 표현됩니다.
2. Word Embedding : 이 벡터들이 word embedding matrix를 거쳐서 low-dimensional vector로 바뀌게 됩니다. 실전에서는 굳이 계산을 하지 않고, 그냥 해당 단어에 해당하는 row만 뽑아도 됩니다.

3. Decoding 과정 : 각 문맥 단어 임베딩 벡터들을 SUM 또는 AVERAGE로 계산하여 하나의 문맥 벡터(context vector)로 사용합니다. 이를 W'_Vxd와 곱하여 전체 단어에 대한 점수를 만든다.
Skip-Gram vs. CBOW
✅ CBOW (Continuous Bag of Words)
- 입력: 주변 단어들 (context)
- 출력: 중심 단어
✔️ 학습 예제 수가 적음 (하나의 중심 단어 예측)
✔️ 자주 등장하는 단어에 대해 성능이 좋음
✔️ 학습 속도 빠름
✅ Skip-Gram
- 입력: 중심 단어
- 출력: 주변 단어들
✔️ 학습 예제가 더 많음
✔️ 희귀 단어(rare words)에도 잘 작동함
✔️ 학습 느리지만 표현력이 강함
'인공지능 > NLP' 카테고리의 다른 글
| [NLP] 간단하게 인공지능 챗봇 만들기 (8) | 2023.06.29 |
|---|---|
| 챗GPT와 제대로 대화하기 - 프롬프트 엔지니어링, "Act as~" Hack (16) | 2023.06.26 |


